
I recently co-hosted the May “Sydney UC” Meetup with fellow MVP Craig Chiffers. We normally run these at a conferencing centre in the middle of the Sydney CBD, but circumstances dictated this one be held virtually. Naturally it was going to be over Microsoft Teams.
You have two options for a Teams Meeting – a normal “in-tenant” meeting, or a Live Event.
Microsoft Teams Live Events are ideal for larger “town hall” style one-to-many meetings, more like a city council meeting or other “broadcast” event. The event is streamed via an Azure Content Delivery Network (CDN), and as such there’s a lag between your presentation and its reception that prevents real-time interaction with participants.
Sydney UC is a more interactive and collaborative environment, so we opted to run the event in the tenant. This gave our participants the ability to interact more naturally with the presenters, but perhaps at the expense of some control of the Meetup.
My partner Rocky had been experimenting with Open Broadcaster Software (aka OBS Studio) of late, and we thought the Meetup might be a good opportunity to see if we could add some more of a “pro” feel to the Meetup without compromising its intimacy, and address some other issues.
The Challenge
The Meetup presented one particular challenge.
For some of the sessions we required a “talking head” be the sole image served to the attendees. This is not unlike an education scenario where everyone should be able to see the teacher and not be distracted by the “Brady Bunch” grid showing the teacher and the other participants at the same time.
Yes, you can kinda do that today with the “pin” feature, but that has to be invoked by every attendee individually rather than being controlled from the presentation end.
The work-around: “Content is King”
The old maxim “content is king” rings true in Microsoft Teams: if no-one’s presenting content, you see the video wall of the participants, but if there’s content in the meeting, THAT’S the default view.
I turned this to my advantage, using OBS Studio to take my camera input and present it full-screen on a monitor, then “share” that content – that screen – into the meeting. The power of OBS then also let me add “person on content” and other effects – which is why I’m shown above sitting in front of a green-screen.
This “Lock the video spotlight” feature is officially on the “planned” list. If you agree there’s a need for it, please vote for it on the Microsoft Teams User Voice.
The Setup
Here’s the setup we went with. It looks more complicated than it really is, don’t worry. Bear with me as I explain the components below.
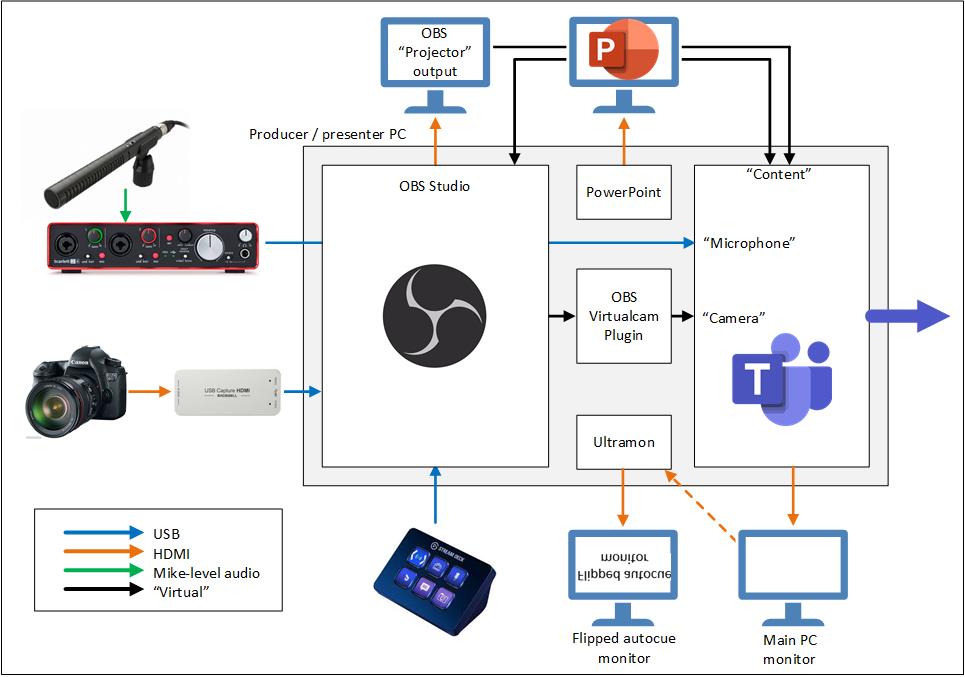
Components
OBS Studio
OBS Studio is an open source streaming and recording program that is effectively a television studio control room in an app. You create scenes using a variety of sources, such as webcams, images, screen captures and videos and switch between them in real time.
Inbuilt chromakey functionality even allows you to superimpose live camera images on other sources, provided you can “key” a background colour – usually green.
OBS Studio was originally created for gamers to live-stream their massively multiplayer online game (MMOG) experiences to platforms like Twitch, but has been embraced by the Microsoft Teams community of late for its pre-production features and ability to output directly to Microsoft Teams via a “virtual camera” plugin.
OBS Virtualcam Plugin
The OBS Virtualcam Plugin makes OBS’ output appear as a camera to your PC. It was this signal that became my “video camera” input into the Teams meeting. I only used this when I wanted the Brady Bunch grid on-screen.
Autocue
The Meetup gave me a chance to take my new home-brew autocue (aka “teleprompter”) for its first public outing.
The whole point of this venture is to be able to look DIRECTLY at someone in a video call, while at the same time staring down the barrel of the camera at them (as they perceive it).
Here’s a better shot of it (without its towel hood).
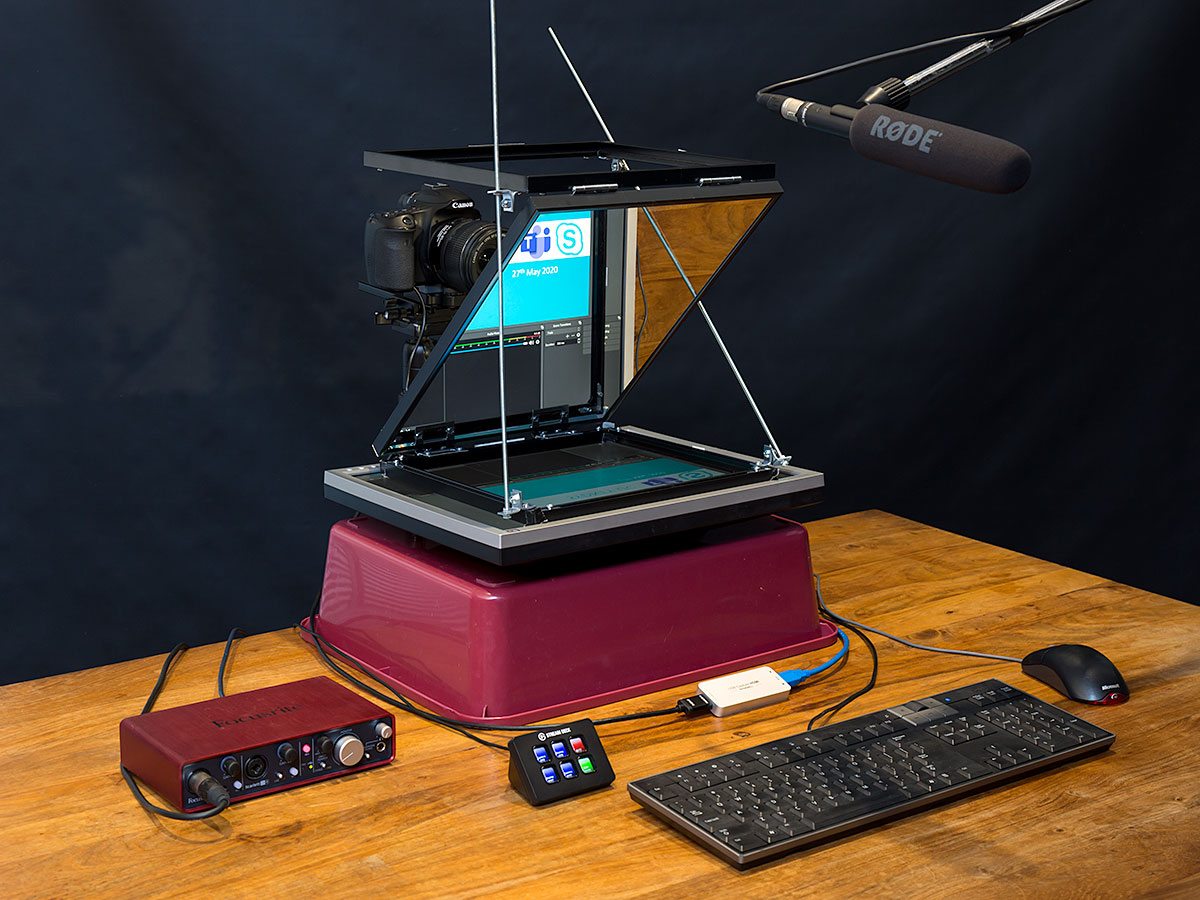
It’s just a sheet of half-mirrored glass in an assembly consisting of three extruded aluminium picture frames. The frames are connected by hinges in a “Z” arrangement, with two lengths of threaded 3/16″ rod providing the means of supporting the upper frame and adjusting for the required 45° angle of the glass. The hinges and rod enable it to pack down flat when not in use, making it both easy to store and portable as well.
I’ll write more of this in a subsequent post.
One of the downsides to shooting through mirrored glass is light that’s lost in the process – around 4 f-stops. As a result we needed a more sensitive camera and improved lighting. Using a DSLR gave us the extra sensitivity we needed, as well as complete control over focus and exposure, resulting in a more consistent image. Added to that is the superior image quality compared to just about every webcam.
Ultramon
According to its website, Ultramon is a utility for multi-monitor systems, designed to increase productivity and unlock the full potential of multiple monitors:
- efficiently move windows and maximize windows across the desktop
- manage more applications with the Smart Taskbar
- control application positioning with UltraMon Shortcuts
- multi-monitor support for desktop wallpapers and screen savers
- mirror your main monitor to secondary monitors for a presentation
I used it for one purpose, and that was to take the main monitor and mirror it to the autocue monitor, flipped horizontally. No, Windows *can’t* do that particular rotation natively. Everything but.
The only downside I noticed is that it introduced a small lag between the image appearing on the main screen and its flipped view appearing on the autocue monitor. I’m guessing a faster machine would have reduced this. [Yes, see Lessons Learnt.]
You can download a full working copy for a trial period. I paid $USD40 for it. For eight times that price I could have done it in hardware with no lag.
Magic Lantern
The Canon 6D made for a wonderful webcam, but limitations in software mean it will only output video for 30 minutes and then go to sleep. Magic Lantern is essentially a “jail-break” for certain Canon cameras that not only circumvents the 30 minute limit, but also removes all on-screen overlays to give you a clean feed out the HDMI port.
Magewell USB Capture HDMI Gen 2
My usual go-to when I want to convert an HDMI output to become a USB camera source is the Logitech Screen Share, but it didn’t like the flavour of HDMI that the camera generated.
The Magewell had no problems with it.
Thus, my video feed went camera HDMI -> Magewell -> USB to OBS.
Stream Deck
Popular with gamers and also the OBS crowd, the Stream Deck is a small desk-mounted box covered with pushbuttons, and each button is itself a small LCD display.
You can program the buttons to do just about anything, and the growing list of integrations link the buttons directly to program features, making it far smarter than just a keystroke emulator. The buttons can be made context-sensitive, automatically updating to follow the app that has the focus (if you wish).
Stack presses into a sequence, create multiple pages, the list goes on.
Rocky and I have one each. Your significant other will surely appreciate the hint to gift you one or two for your next birthday, etc.
During the Meetup I used the Stream Deck Mini shown in the images to control OBS. Being the presenter in the meeting this allowed me to easily change the view – an OBS “scene” – by finger feel alone, without needing to switch to an app, touch a mouse or look at a screen. (Teams doesn’t offer shortcuts to change the video feeds, so I still needed to drive the app directly for those changes.)
Focusrite “Scarlett”
With the audio we might have gone a little over the top, so put this in the optional category.
The Scarlett is our go-to “audio to PC” converter. Think of it as a much higher quality external sound card for your PC. Scarlett feeds 48v phantom power to the Rode mike, acts as a preamplifier and outputs the signal as audio over USB. This became the microphone input into Teams.
Why not into OBS? That was our first approach, but for some inexplicable reason the audio quality was terrible. (It may yet have been the “shortfall” in processing grunt – see Lessons Learnt). As a result we fed the audio directly into Teams, but in so doing ended up with a lip-sync error nobody noticed(?) on the day.
Rode NTG-1 shotgun condenser mike
The best microphone we have for the purpose is the Rode NTG-1 condenser mike, and it requires phantom power. The Focusrite provides phantom power so it was an obvious choice. There are a multitude of battery and USB powered microphones that could be used instead – or yes I could have just gone with the mike in the Poly 6200 you see around my neck.
The reason for choosing the hyper-cardioid pickup pattern of the Rode is that we live under a flight path, and the more directionally sensitive the microphone the better. And we happen to have one. (Two actually.)
Lessons Learnt – Things to do better next time
“EOS Webcam Utility”
Canon, Fuji and presumably other camera brands have woken up to the opportunity that working from home provides for using their DSLR cameras as a high quality webcam.
We didn’t realise it existed at the time, but Canon’s “EOS Webcam Utility Beta Software” would have turned a 6D Mk-II into a hi-def USB webcam – but alas ours is a Mk-I.
Canon also has a “Clean HDMI” version that lets you use the HDMI output of their more recent models, if that’s better suited to your setup. (Scroll to the bottom of the Clean HDMI page for the list of supported models.)
Use a Faster PC
As described above, the setup had a noticeable lip-sync delay. This was to be expected given the audio was taking a shorter path than the video.
The machine we produced the Meetup on had a 3.1GHz quad-core i5 CPU and 8G RAM. We observed around a 200ms delay in the video.
After the event Rocky re-staged it on another machine, a 3.4GHz quad-core i7 with 32G RAM and the delay all but vanished, dropping to 10ms.
Flip the autocue monitor in hardware
If you plan to participate in a lot of video calls using an autocue, invest in something like a Decimator MD-HX. This takes HDMI in and will generate a flipped HDMI out. One of these would have reduced the monitor count by one and provided me with a closer-to-real-time view of the participants.
Don’t overlook
If you’re planning a similar venture, here are a few tips to help you succeed:
- PowerMake sure you have a mains power supply for the camera, or a freshly charged battery and you’ve TESTED how long you’ll get out of it.
- Use a wired networkPlease lord don’t just connect to your home WiFi. Go wired. Run a temporary cable if you have to.
- Beware of heatIf like here your DSLR is hidden under a hood to keep light out, it’s going to get hot in there. Make sure not too hot, or find a way of cooling it. Even a small USB fan will get some air moving.
- Don’t bake the autocue monitorThe autocue monitor is designed to operate upright with convection cooling. When it’s upright, air passes through the vent slots top and bottom, with the hottest air escaping out the top. That won’t happen when it’s on its back! Get another fan.
- A confidence monitorAssuming you have a spare PC/laptop, join it into the meeting as a participant. Mute the mike and speaker, and have it somewhere that you can see the screen – ideally behind the camera (although in the shots here it was at my 9 o’clock). Refer to this when you’re switching sources so you know what the participants are seeing. (How many meetings have you been in where someone’s halfway through their slide deck before they learn you’re still only seeing slide 1 – or them?)
- DND your phone!We’ve all been there, I know. I had a regular daily alarm fire just as the Meetup kicked off. (Not that DND would have silenced that.)
Questions or comments?
You might consider it a complicated setup, perhaps unnecessarily so, but I was a good experiment and has shown the sorts of production effects that are easily added into a Microsoft Teams meeting.
Did I miss anything? Have you done this better with less? Questions? Hit me up below.
Revision History
14th June 2020. This is the initial publication.
16th June 2020. Updated the “Setup” image to show PowerPoint’s monitor feeds into both OBS and Microsoft Teams.
– G.


About that EOS webcam utility….you’d be disappointed. It does not “turn a 6D Mk-II into a hi-def USB webcam.” The USB port is just USB 2. The camera can only deliver uncompressed video over the USB link, so it’s capceptually limited to something less than 720p30. As a practical matter, it actually delivers about 720x576p24…nominally SD resolution.
There have been other utilities that do this for years. I reviewed Sparkocam back in 2013. https://www.mgraves.org/2013/10/webcams-5-sparkocam-my-canon-rebel-xsi/
“Presentation mode” in Windows 10 is also something I recommend. It can be enabled on either laptops or desktops. It ensures you’re not getting any random notifications, system sounds, etc.
I was wondering if dropping the “canvas” video from 1920×1080 60 fps to 30 fps would have helped on the video lag.
It does NOT I found out.
I tested on an i7-9700/32GB/Intel UHD 630 with 60 fps with a decent amount of stuff going on at between 1.5 to 2 ms frame render time.
I then tested after switching the video settings to 30 fps – behold my render time increased to 2.5 to 3 ms
Great Article, love how you solved that “eye contact” issue!
For the audio problem: If you install something like “Virtual Audio Cable” or “jack”, you can re-route the audio through obs into teams. So the Video and Audio Latency are in sync so to speak.
You basically need some kind of “audio loopback”, which turns an additional virtual output (on OBS) in an additional virtual input (in Teams). Luckily with my RME Audio Interface it can be done natively.
Hi,
I would be interested on how you handle that with the monitors.
In my setup for a workshop i have a camera to myself as a teacher, a powerpoint and also a browser window to share.
Where i struggle is with what do i show where. I have a notebook and an extra screen. I would need the OBS studio, MS-Teams and also the presenter view of the PPT which could be displayed on my notebook screen and should be no problem. i can share the PPT output and the browser from the other screen then. But when i am not using the virtual camera, but the “screen sharing” option (sharing the output window from OBS into teams) then i might need a third monitor because one screen is already occupied with the “controlling” stuff and the other with the PPT which is screen captured into OBS.
Can i solve this only with a third monitor? Or should we maybe use an additional computer connected to the MS-Teams room to share the PPT?
Or am i missing something?
Thank you!
I feel your pain, absolutely.
I definitely think you’re trying to do a lot with only two monitors, and truth be told I would have benefited from a fourth to seamlessly manage my sources and inject them via OBS into the meeting – but then I was aiming for a pro broadcast look.
That’s the tradeoff: the more pro you want this to appear to the attendees, you need more tech, more monitors, and potentially more bodies.
A lot of the time we try to do too much in meetings on our own, and all that juggling detracts from the glossy experience you’re wanting the attendees to have. The original model for ‘broadcast meetings’ (now ‘live events’) had the presenter and producer as separate roles, and I think the moment your meeting’s complexity or production values require you to add OBS into the equation, you’re better off with an assistant to manage the vision switching, leaving you to focus on the delivery.
And you still need lots of monitors.
Hi,
i just found your post, I have two questions
firstly in relation to this quote
“I turned this to my advantage, using OBS Studio to take my camera input and present it full-screen on a monitor, then “share” that content – that screen – into the meeting”
did you use the “Full Screen Projector(Program)” and send that to an external screen, and then in your teams client, share content, and select that 2nd screen as your content source?
secondly, as you were using “content share” to push your video , did you just turn off your camera in the teams client? and do you have any screenshot of what it looked like from both your perspective and that of someone watching the event?
Hi Jason,
1: Yes. That was the only way at the time I could control the full-screen experience to the participants.
2: I think for those I was just leaving it on. (I’m struggling to remember now). I don’t have any images of what it looked like from the participants’ perspective, as it didn’t look like anything special – that was the magic of it.
Here’s another another photo, this time showing how the participants (laptop, far left) are seeing the output from the OBS projector output (extreme right monitor, on the stool), and a tiny ‘picture-in-picture’ of me in the bottom right of the laptop’s screen, that being my ‘camera’ feed.
Dear Greig,
Thank for your article !
I have a problem with a Teams Meeting using OBS studio with a PowerPoint + green screen + a speaker.
I’ve record the meeting and when someone remotly speak into the meeting, my PowerPoint+speaker is cut..
Any idea ?
Thank you.
Armand