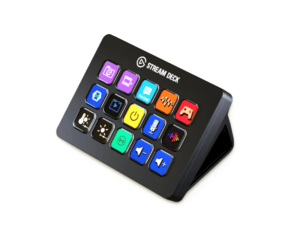
I’ve blogged about our love affair with the Stream Deck programmable buttons before. If you’re not familiar with them, they’re a neat little “mini keyboard”, and under each key is a full-colour display. One of these will let you send a frequently-used key sequence with a gentle tap, and the inbuilt ‘Profiles’ allow it to change its layout depending upon which app has the focus.
With one of these on our desks here at home it was only a matter of time before the hubby asked me to add lighting control to it.
It’s a bit clunky, but here I’m using Stream Deck to POST some JSON to a Home Assistant automation, which in turn fires a script that squirts the appropriate command to KNX via HA’s KNX Integration. All you need to send is the relevant Group Address and the byte you want sent. This allows for control of ANY light, all with the one automation and script.
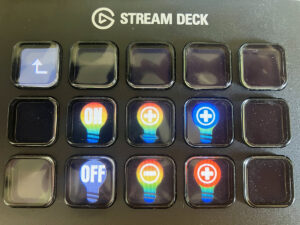
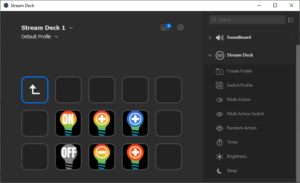
Here I show how we’ve configured 6 buttons to select from On, Off, Dim Up, Dim Down, Colour Temperature Up & Colour Temperature Down. The icons I’ve created are in the accompanying repo.
Pre-req’s
- A working KNX installation, with an IP interface or router.
- A working Home Assistant node.
- The KNX Integration for HA.
- The ‘JSONSender’ plugin for Stream Deck.
- A Stream Deck – although if you keep reading, you’ll find it’s not actually mandatory.
The Setup
The script
The script is in the project’s repo at GitHub, see below, but here it is in its entirety.
Paste this into your HA’s ‘/config/scripts.yaml’ file:
send2knx:
  alias: Send2KNX
  mode: queued
  max: 2
  sequence:
    - service: knx.send
      data:
        address: "{{ payload.group }}"
        payload: "{{ payload.value }}"
All we do is issue a ‘knx.send’ command to the relevant Group Address (‘GA’) and the ‘payload value’ we send – in the context of the Group Address – dictates the action KNX takes.
To turn a light on, we just send a ‘1’ to its ‘Switch’ GA, and to dim the light we send the appropriate byte to its ‘relative dimming’ GA.
The automation
The automation exists only because you can’t trigger a script from a webhook.
It’s also in the repo, but here it is again in its entirety. Paste this into your HA’s ‘/config/automations.yaml’ file:
- alias: JSON to KNX converter
  id: json_to_knx_converter
  description: ''
  trigger:
  - platform: webhook
    webhook_id: send_knx_message
  condition: []
  action:
  - service: script.send2knx
    data:
      payload: '{{ trigger.json }}'
  mode: single
The ‘webhook_id’ is the URL we’ll send from the Stream Deck, and of course you’re free to change this to something else.
Likewise, ‘send2knx’ is the name of the script created in the prior step, so those two need to align.
The JSON
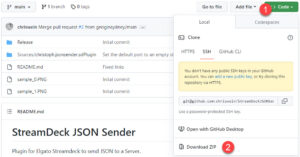
There’s a trick to install the ‘JSONSender’ plugin: you need to download the code instead of clicking on the compiled version. (The latter still has a bug in it as at this date, which has been fixed in the code).
- Unzip the download.
- Browse to the Sources folder, which will contain another folder called ‘christoph.jsonsender.sdPlugin’.
- Click on this ‘christoph.jsonsender.sdPlugin’ folder and ZIP it.
- Rename the new archive ‘christoph.jsonsender.sdPlugin.streamDeckPlugin’ (without the .ZIP extension).
- Double-click on it.
- Click Install when prompted:

- Now in the Stream Deck management console, expand Custom, then click and drag “{} JSONSender” onto as many buttons as you want. I’m creating six buttons:
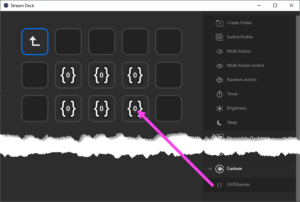
- Edit the configuration of each button, customising the JSON field for each with the relevant Group Address and required action.
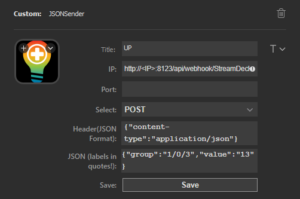
- Customise the icons or add some labels as required.
- Here’s the finished product:
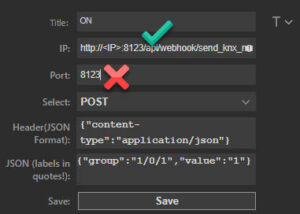
IP
http://<IP>:8123/api/webhook/send_knx_message
Port:
It’s important that you leave this blank. The required port (8123) needs to be baked into the IP as shown above.
Select:
POST
Header:
{"content-type":"application/json"}
JSON:
This will turn group address ‘1/0/1’ on when the button is pressed:
{"group":"1/0/1","value":"1"}
This dims the same light (via its respective ‘relative dim’ group address) ‘up’ a step:
{"group":"1/0/3","value":"13"}
We’ve installed lights with control of their colour temperature, so this button config lets me step the colour temperature warmer or cooler using the “Dim colour temperature” group address:
{"group":"1/0/6","value":"13"}
No Stream Deck? PowerShell to the rescue!
I’ve knocked up a basic PowerShell script that you can fire from your computer at will.
.\Send-toKnx.ps1 -hostname 10.10.10.1 -webhook send_knx_message -group '1/0/1' -value 1

Truth be told you don’t even need a script. You can just execute this from the command line:
Invoke-WebRequest -Uri "http://<IP>:8123/api/webhook/send_knx_message" -Method POST -Body (@{"group" = "1/0/1"; "value" = "1"}|ConvertTo-Json) -ContentType "application/json"
Debugging
If it doesn’t work, there are a few things to check.
The PowerShell command will very quickly isolate the issue to being either in your Stream Deck or Home Assistant. If PowerShell works, the problem’s in Stream Deck, but if PowerShell sends without error and nothing happens, I’d be focussing on HA. HA’s logging would be your next port of call. Check out the File Editor and /config/home-assistant.log.
Careful with your ports
The JSONSender plugin lets you specify the Port in its config, but that won’t work in our implementation. Make sure port 8123 is specified in the ‘IP’ field, after the hostname/IP address, as shown here:
“Received message for unregistered webhook send_knx_message:80 from <IP>”
If it’s not working and Home Assistant logs your webhook is unregistered, double-check you’re not using the wrong version of the JSONSender plugin. Right-click on the plugin and Uninstall it, then re-install the code version as outlined above.
Nope, it’s still broken
If you’re still having problems, or if you find an issue with the script or HA code, please log an issue on the repo.
Shortcomings / Futures
Sadly it seems the Stream Deck doesn’t have automatic key repeat, so if you press and hold a Dim button, the light won’t keep stepping – you need to stab it repeatedly until the light is at the intensity or colour you desire. It might be possible to edit the plugin to add that, but I’ve not looked into that.
In the script I’ve chosen a relatively large step value for these. If you decide it’s too large, just tweak the values down a little. (I used ETS’ ‘Group Monitor’ and ‘Write Value’ to sniff the values to send.)
References
- My streamdeck2knx repo @ GitHub
- Elgato’s Stream Deck: Vendor page / Amazon affiliate link
- Christoph Wein’s StreamDeckJSONSender
- HA’s KNX Integration
Revision History
30th October 2022: This is the initial release.
– G.
