Skype for Business – like so much else these days – relies on PKI certificates, and the community has risen to the opportunity with some great tools to help us manage them.
Here are two in my “essentials” kit:
- Check out the “Lync Certificates Report“: If you’ve not found it already, Guy Bachar & Yoav Barzilay (with some input from Anthony Caragol) – and now Amanda Debler – have crafted a fantastic script that will read your Lync/SfB topology and query all the servers (using WinRM) and gateways then prepare a report showing how long each of the cert’s still has to live.
- If your new OAuth cert isn’t replicating or your Front-End service won’t start, it might be due to bad cert placement. David Paulino’s “Test-CertificateStore.ps1” to the rescue!
I recently found myself needing to update ALL of the internal certs for a couple of deployments – one of them quite large – and I spent many hours checking and re-checking to make sure I’d not misspelt or overlooked a SAN in all of the requests.
Yes, the Deployment Wizard and PowerShell are meant to include all of the expected SANs in the automated request, but your existing certificate might contain others that aren’t added automatically:
- a site-specific simple URL (thank you Justin for the walk-through)
- the scheduler (nod to Chad)
- ucupdates-r2
- or all of the Front-End FQDNs so the one cert can be deployed across the entire EE pool.
PowerShell to the rescue!
What is Update-SfbCertificate.ps1?
“Update-SfbCertificate.ps1” (herein just “Update”) basically just acts as a front-end for the “Request-CsCertificate” commandlet – but it starts the request process by first reading in the details of the certificate you want to replace or renew.
The “Request-CsCertificate” (“Request”) commandlet requires a lot of parameters to create a complete certificate request, and yet for quite a lot of them the values you probably want to use are already in your existing certificate: Organisation, OU, City, State, Country being the obvious ones. So the existing values become the template from which this script will request a replacement. If you want to override or replace any of the existing values, any you provide from the command-line will be used instead of those coming from the existing certificate.
“Update” also reads the existing SANs from the certificate and adds them to the “Domains” parameter that will be fed into “Request” – but you’re free to inject any others you want too just by naming them in a comma-separated list, as you would if you were running the “Request” cmdlet directly. (Don’t worry about any unwanted repetition – I de-dupe the list).
I’ve forced the “-confirm” switch so you’ll be presented with the values that are about to be fed to Request & have a chance to abort and revise the values. (I even present a couple of warnings if you might be about to proceed with some unintended values).
Upon successfully requesting a new certificate from your online CA it will automatically installed to the server, and then an on-screen comparison will show you where the two differ. Expected differences (like the “not before”, “not after”, “serial number” and “thumbprint” values) will be displayed as warnings, whilst any unexpected differences (like changes to SANs) will be represented as Errors. Any changes the user specified from the command-line will also be shown as warnings to provide confirmation they were enacted.
If you like what you see, the commandlet to Assign this new certificate will be found on the clipboard, ready to paste and enjoy. If the cert’s aren’t aligned correctly, you’re free to repeat the process, adjusting the parameters until the values are agreeable. As always, please keep a note of any unsuitable certs that may be issued so you can delete them from the server and revoke them from the CA.
Features
- Choose your starting position: Start with the currently-active cert for a given role (e.g. Default), or specify the thumbnail of a particular cert
- No need to neaten the thumbprint if you’re copying from the certs mmc: just scrape it from there and paste it in, spaces, warts and all (but don’t forget to put it inside quotation marks if it has spaces)
- Automatically ensures all the SANs on the existing cert are copied to the new one: no more omissions or typos
- Lets you consolidate separate Default, InternalWebServices & ExternalWebServices front-end certs into one new Combined cert, with the SANs from all three
- Include the “-AllPoolMemberServers” switch and the script will add the FQDNs of all FE’s in the pool as SANs
- Copies all of the mundane Org, OU, City, State, Country values across for you
- Automatically reads the server’s FQDN and feeds it to the request commandlet as the “ComputerFqdn” parameter. (Specify “-ComputerFqdn $null” to disable, say for an Edge server)
- Pops a warning if you’re about to renew a cert with a 1024 bit key. (Friends don’t let friends…)
- The more the merrier: don’t be concerned for the same SAN appearing multiple times in your new certificate – the script de-dupes the list
- Works in online and offline mode
- Shows the existing and new certificates side-by-side so you can quickly see what’s unchanged or different between them before you Assign the new one into service
- If the new certificate meets your requirements, you’ll find the commandlet to Assign it is on your Windows clipboard after the script exits!
- Uses your existing PowerShell colour scheme to represent the identical, expected and unexpected differences
- Even though long values are truncated on screen, they’re compared at their full length before being truncated
- Breaks out all of the SANs to a line each, clearly showing any that are added or removed
- Code-signed so it’ll run in restricted environments. (Thank you Digicert)
- Automatically adjusts the column widths to make maximum use of the screen
Shortcomings, Weaknesses
- If you’re requesting a new certificate on behalf of another server (as you might normally by using the “ComputerFqdn” parameter) you’ll need to first install its ‘starter’ cert on this server so it can be read when you add the “-Thumbnail” parameter
- If you are consolidating multiple Front-End certificates into one replacement cert, the existing ‘location’ values (City, State, etc) are only captured from the first certificate. SANs are however read from all the certs you nominate (e.g. Default,WebServicesInternal,WebServicesExternal) & de-duped
- You can’t remove SANs that are no longer required
- You can only request an Offline certificate when running this script on an Edge server (and you’ll need to specify “-ComputerFqdn $null” to stop it attempting to read the Topology). Another approach is to copy the Edge’s cert to an FE and do it from there!
- Outputs to screen using “write-host” and not to the pipeline
- PowerShell v2 (Server 2008R2 & Windows 7) doesn’t reveal all of the values to me. Rather than prevent the script from running under v2, I pop a warning
- Needs to be run as Admin to reliably show all information
How-To
Here are some examples of how to use it:
This is your minimum to refresh an existing FE cert. This makes no changes to the cert’s values (other than the new Friendly name of course):
PS C:\> .\Update-SfbCertificate.ps1 -type default,webservicesinternal,webservicesexternal -FriendlyName "Combined SYD Pool FE cert 27Apr2016" -ca MyCA.contoso.com\My-CA
Refresh your existing FE cert. Add all the pool FQDNs and make sure the SIP domains are all there too:
PS C:\> .\Update-SfbCertificate.ps1 -type default,webservicesinternal,webservicesexternal -Verbose -FriendlyName "Combined SYD Pool FE cert 27Apr2016" -ca MyCA.contoso.com\My-CA -AllPoolMemberServers -AllSipDomain
Has someone recently updated the server’s cert and overlooked a SAN? We’ve all been there. Use the thumbprint of the old one and inject the SAN:
PS C:\> .\Update-SfbCertificate.ps1 -type default,webservicesinternal,webservicesexternal -Verbose -FriendlyName "Combined SYD Pool FE cert 27Apr2016" -ca MyCA.contoso.com\My-CA -Thumbprint "?12 34 56 78 90 12 34 45 78 89" -Domain "OverlookedSAN.contoso.com"
Show me
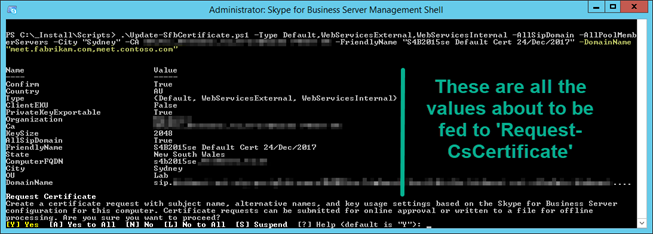
Here I’m requesting a new default,webservicesinternal,webservicesexternal certificate for my Front-End. I’m providing the details of the CA, specifying a new Friendly Name, changing the City to “Sydney”, adding all SIP Domains, all FE’s in the pool, and adding SANs for meet.contoso & meet.fabrikam:
The script pauses at this point. On-screen (to the left of the green bar here) are all the values that will be fed into “Request-CsCertificate” if you agree to the Confirm prompt at the bottom.
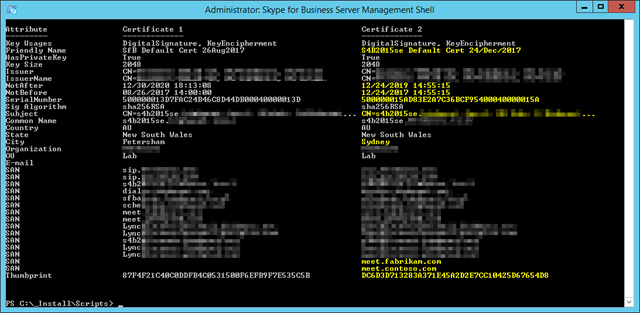
Here’s the output, comparing the original certificate(s) with the new one. The attributes shown in yellow (my PowerShell ‘warning’ colour) highlight the expected differences between the certificates. (The NotBefore, Not After, Serial Number & Thumbprint will always be different).
If any attributes differ between both certs that you didn’t request, they’ll be highlighted in red (or your PowerShell ‘error’ colour). Examples of these might be SIP domains that have been added to or removed from the topology since the original certificate was created.
Download
You’ll find a code-signed version of the script on GitHub. You’re welcome to pinch, adapt or improve upon the code with my blessing. If you encounter any problems with it please create an issue on the repo.
Revision History
6th June 2020
Updated the Download link to point to GitHub.
v1.3: 12th May 2018
- Added an abort line that kills the script when running in the (unsupported) PowerShell ISE. (Screen-width and coloured output don’t work)
v1.2: 24th December 2017
- Improved the way the “Subject” is parsed in ParseCertSubject by trimming leading spaces
- Added “E=” for those certs where an e-mail address has been provided. (Not applicable to new cert requests via the “Request-CsCertificate”)
- Changed the cert comparison highlighting: no longer shows in ‘warning’ colour if the user provided a ‘new’ value but nothing changed in the resulting cert
- Incorporated my version of Pat’s “Get-UpdateInfo”. Credit: https://ucunleashed.com/3168
v1.1: 19th February 2017 – the “Thank You Mike Shivtorov” bugfix & suggestions release
- Added ‘XmppServer’ certificate type, overlooked in the original release
- Changed Output request file example text from “.pfx” to “.req”
- Added another example to better document how to generate Edge certificates
- Improved offline request process: now finds and re-opens the offline request, then feeds it to the comparison engine for display
- Added an extra Exception trap to the Request-CsCertificate handling: script now reports cleanly if you request an inappropriate Type
- Sorted Key Usages before sending them to the Compare engine in an effort to reduce false positives
- Fixed bug where KeySize was reported in red instead of yellow when the user provided a new value
v1.0: 7th May 2016. Initial public release
- Improved the error reporting when Request-CsCertificate fails
– G.


Hi Greig,
I dont know if your script is affected by this, but I found an interesting blog post regarding certificates using CNG and Lync 2013 (Stb 2015 wasnt mentioned, but knowing MSFT everything is possible at worst case).
https://ucvnext.org/2015/10/cryptoapi-ng-certificate-support-for-lync-server/