Given that by default anyone can see a user’s presence and Personal Note, I thought it’d be an interesting challenge to see if I could turn Lync into a remote indicator panel to provide distributed monitoring of a process or an application.
All we need are some sensors to interface to the real world, and a means of converting them into computer signals for Lync. I decided that the easiest way of doing this is to use a device that emulates a keyboard (a HID), saving me the hassles of trying to code a driver and at the same time binding the project to specific interfacing hardware.
Unfortunately I hit an early hurdle when I found that there are no keyboard shortcuts to change your presence. (There are LOTS of keyboard shortcuts. They’re here: Lync 2010 / Lync 2013). This then necessitated the construction of an App that would capture keys and manually (through the client API) set the appropriate values in the client.
And thus, my Client-Side API project “HIDnLync” was born. It was relatively easily enough done. I’ve taken my Elyza app, stripped most of the intelligence out of her, added a Setup GUI (largely recycled from Profiles For Lync), and now when you hit certain key-combinations, your status and/or Personal Note change. (HIDnLync and of course Lync both need to be running for this to work, but they only need to be in the background, and the machine CAN be used for other things imperceptibly).

Arduino Leonardo
The final piece to the puzzle is of course the way to interface to the outside world, and for this project I’ve used an Arduino Leonardo micro-controller. The Leonardo is a relatively new addition to the family, and offers the ability to program it down its USB port whilst that same port emulates a keyboard. (Mine landed overnight by Aussie Post from RobotGear in Perth).
The Arduinos, their clones and derivatives have taken the world by storm, and I don’t propose going into detail about them here. Suffice to say that (once I’d rebooted Windows 8 into ‘safe mode’ to install the driver to program it), it was no longer than 5 minutes before I had ‘Leo’ generating keypresses.

Edge Triggering
The real world uses lots of level-triggered devices, but for our keyboard input to work we need to convert all our levels to Edge or “state-change” triggering. When an event is “set” (like a door opens), we need to send a trigger message to HIDnLync, and then when it “clears” (the door closes) we need to send another. This means each message from the Adruino to the PC only reflects the change of state. If we tried to run with Level triggers, you wouldn’t be able to use that PC for anything else, as a whole stack of random keys would be potentially pressed at any time – rendering the PC and HIDnLync completely useless when multiple events overlapped.
Don’t Forget to Debounce the Inputs!
Do not pass go, do not colllect $200. The sample below has been debounced. You might take this a little further to ‘throttle’ the maximum number of events the Arduino will signal to the PC in a given time-period.
A Sample Sketch
Here’s a very basic “sketch” that will do the job. It reads the input of Digital Pin 3, sending ctrl-shift-a when it’s pressed, and control-shift-b when it’s released. Simply copy the code (and change the key!) for any other inputs you wish to monitor.
I’ll leave it you to to build upon this as you see fit, and hook it up to whatever external sensors you can imagine.
/*
Keyboard Button test

Sends a text string when a button is pressed.

The circuit:
* pushbutton attached from pin 3 to +5V

This code is modified from an example in the public domain:
http://www.arduino.cc/en/Tutorial/KeyboardButton
http://arduino.cc/en/Tutorial/Debounce

Code modified by Greig Sheridan, January 2013.
https://greiginsydney.com/hidnlync

*/

//  Set the input pin
const int buttonPin = 3;      // input pin for pushbutton

const int ledPin = 13;    // output pin for the on-board LED
int lastButtonState = HIGH;   // for checking the state of a pushButton

// the following variables are long's because the time, measured in miliseconds,
// will quickly become a bigger number than can be stored in an int.
long lastDebounceTime = 0;  // the last time the output pin was toggled
long debounceDelay = 50;    // the debounce time; increase if the output flickers
int latch = 0 ;              // We'll set this so we only fire once through each transition

void setup() {
// make the pushButton pin an input:
pinMode(buttonPin, INPUT);
}

void loop()
{
int currentButtonState = digitalRead(buttonPin); // Read the pin

// If the switch changed, due to noise or pressing:
if (currentButtonState != lastButtonState)
{
lastDebounceTime = millis(); // reset the debouncing timer
lastButtonState = currentButtonState;     // save the reading.  Next time through the loop it'll be the lastButtonState:
latch = 0 ; //Reset the latch value
}
else if ((millis() - lastDebounceTime) > debounceDelay)
{
// whatever the reading is, it's been there for longer than the debounce delay, so that makes it valid.

if (latch == 0)
{
//if the button state has changed, and it's currently pressed:
if (currentButtonState == HIGH)
{
Keyboard.begin();
Keyboard.press(KEY_LEFT_CTRL);
Keyboard.press(KEY_LEFT_SHIFT);
Keyboard.press('a');
Keyboard.releaseAll();
}

// if the button state has changed, and it's NOT currently pressed:
if (currentButtonState == LOW)
{
Keyboard.begin();
Keyboard.press(KEY_LEFT_CTRL);
Keyboard.press(KEY_LEFT_SHIFT);
Keyboard.press('b');
Keyboard.releaseAll();
}
digitalWrite(ledPin, currentButtonState); //For Convenience/debugging

latch = 1; // Set the latch so we only fire once per transition
}
}
}
Here’s a link to the “Keyboard Modifiers” you can use, to see which ones will align with HIDnLync.
How Do I Use It?
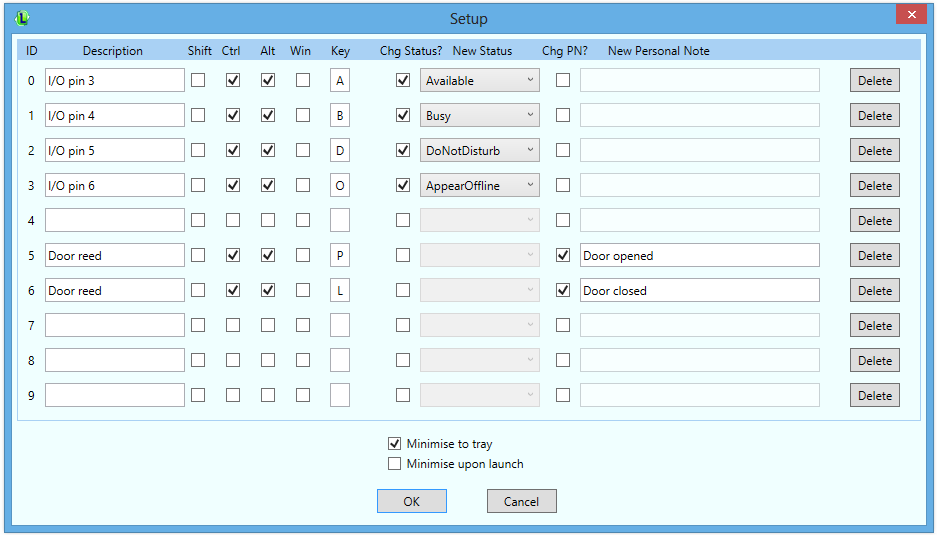
When you first launch HIDnLync it won’t have any shortcuts registered, so will be dormant/passive in operation. Click File/Setup to access the Setup form. Here you can define up to 10 triggers that will update the local user’s Lync client when they’re received.
You can choose any combination of Shift, Control, Alt and the Windows key, in conjunction with any single letter or numeral on the keyboard. This flexibility lets you create unique combinations that won’t clash with other applications.
For each key combination, use the checkboxes to enable either a change of status, a change to the Personal Note, or both. If you check the box for Personal Note and leave the adjacent text field empty, the Personal Note will be cleared when that trigger is received.
TIP: You can temporarily disable the actions for a trigger by un-checking the relevant boxes. The triggers will remain active in Windows and will be logged in the monitoring window, but no further action will be taken.
Using the description field is entirely optional. It’s there for when you’re driving HIDnLync from an external input and want to note what control source (e.g. relay channel or I/O pin) is generating the trigger – more on that below.
When you click OK, the page confirms the inputs are valid before it will close. Errors – conflicts with existing programs already using the nominated key combinations – are reported to the user to be remedied.
HIDnLync can be set to minimise to the system tray and to also launch minimised. While on-screen, it shows an audit trail of trigger events.
Features / Limitations
HIDnLync lets you register key combinations to trigger events to the client. The app doesn’t know if a nominated combination is in use, so some trial-and-error is likely to be required in the setup. If you try to register a new key combination that’s already in use, you’ll be notified of this when you try to Apply or OK the update.
The registration process for a key sequence is a “first in” process, so if you encounter problems with a key combination not doing what it’s meant to, just select Setup (^S) and click OK: this will confirm if another app’s stolen your Hotkey, but unfortunately isn’t able to identify the App responsible.
Video Demonstration
Watch the demo on Vine:
Download the Application
You can download HIDnLync from the TechNet Gallery:
Both versions happily co-exist, but have separate config files.
Applications
Applications can be frivolous or serious:
- If you have an external status indicator like a Blynclight or a Busylight, you could add a foot-pedal and switch yourself into Busy or DND when an unwanted visitor approaches
- Or how about running Lync on a PC in the server room, with a PIR sensor nearby? Whenever movement is detected it sets the status as Available. After movement has ceased, the Computer Room’s account shows as “Away 5 minutes” (etc), providing a simple indicator of how long it’s been since someone was last in the room
- Engage “stalker mode” (“Tag for Status Change Alerts”) and multiple people can be instantly notified when the room is next accessed
- Add a reed switch to a door and have the client’s Personal Note change to “door opened” then “door closed” – and monitor the history on your “News Feed” tab – complete with time-stamps!
- Have Maintenance hook the Arduino up to an output on the aircon or security systems, and know at-a-glance when a compressor or fan is running (or last ran)
- If you have a PC in a distant meeting room, use the PIR to change the room’s state to ‘occupied’ when there’s someone in there
If you come up with any interesting applications for HIDnLync, please let me know!! I’d *really* love to hear what quirky and unconventional uses you’ve managed to put Lync to!
Credits
As usual, Stack Overflow has been of inestimable value. Special credit however must go to Sudhir Kumar for the “RegisterHotKey” code I’ve used.
Revision History
14th Nov 2015: Embedded the Vine video into the page.
– G.


Can sample CSV of adding custom presence/Status be provided? I tried adding but does not work