This is part 2 of a 2-part series covering how we built the “Disco Death Star”:
Part 1 – The Build – construction and assembly
Part 2 – Control, programming & examples – (this post)
The controller
Here’s the final version of the control PCB. It’s a bit of a dog’s breakfast, but it’s what you get when your proof of concept morphs through prototype stage to become the finished product.
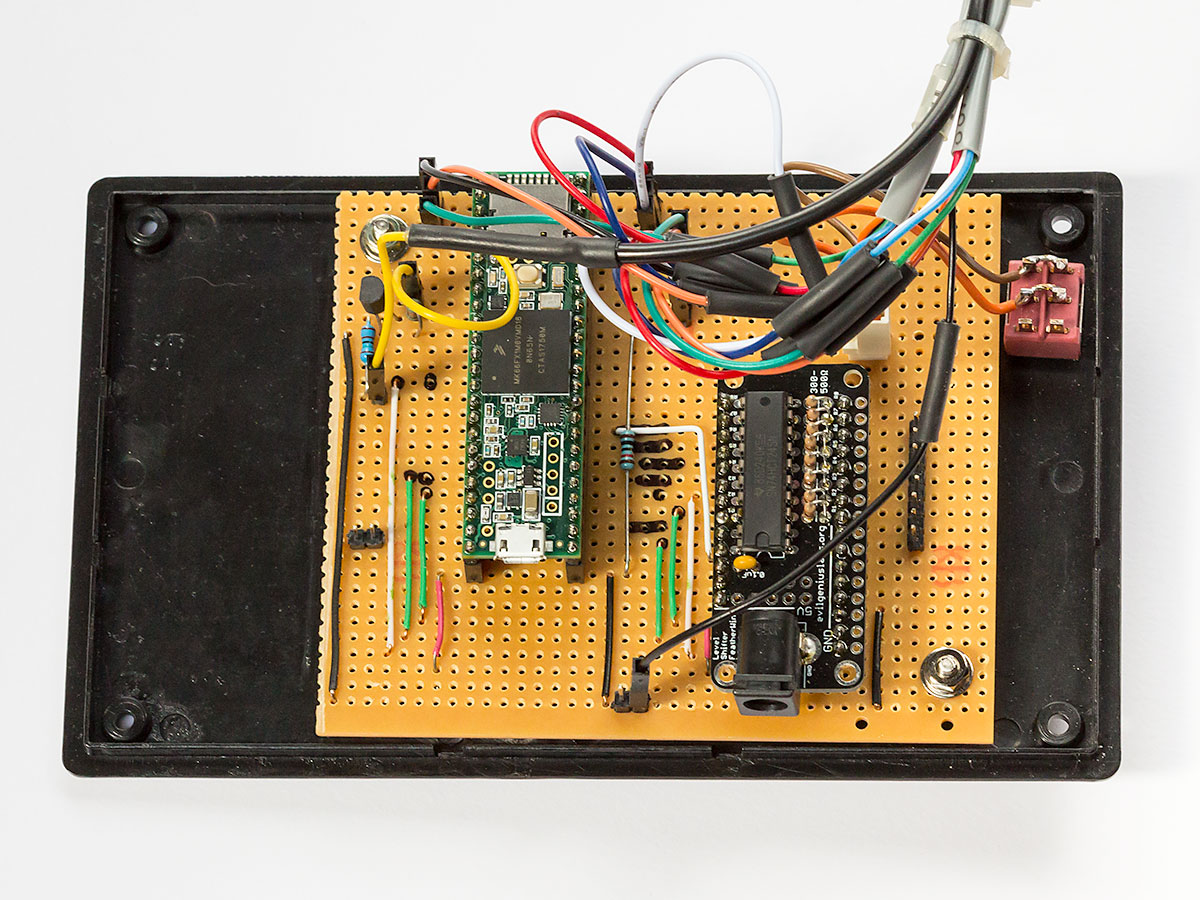
At the left is the Teensy 3.6 that’s running the show, and on the right is the “Octo Level Shifter FeatherWing“. The level shifter is there purely to convert the Teensy’s 3.3V IO pins to the 5V required by the LED strips. I SHOULD have used a “Teensy 3.2 OctoWS2811 Adaptor“, but I didn’t know at the time it existed – and of course that explains why there wasn’t a Teensy version in the store and was forced to compromise on this Feather version. (D’oh!)
To the right of the Level Shifter are 8 header pins – those are the data feeds to the ball.
As it was initially built, that’s all there was. When you applied power the ball ran the chases in a random order, each for a semi-random period of time (in between two bounds I’d hard-coded).
Let’s add some DMX
Later some friends decided they thought it would look great at the annual Tropical Fruits New Year’s party in Lismore, and for that it would need some proper remote control – and for that it would need to respond to the “DMX512” digital lighting protocol.
I won’t go into the DMX side of things here in much detail, but suffice to say I didn’t think there was enough grunt in the Teensy to balance the timing requirements of receiving the DMX512 data string AND driving all the LEDS out 8 IO pins simultaneously – and if there was, I doubted my own ability to pull it off.
Accordingly, I opted for a discrete controller, based on a SparkFun ESP32 Thing Plus and its DMX to LED Shield. Special commendation here goes to luksal for their ESP32-DMX-RX, which worked for me where the native SparkFun library would not.
My DMX interfacing needed to be primitive because I didn’t want to add a processing load to the Teensy, and so it uses 5+3+3 IO pins in a parallel arrangement to signal pattern, speed and brightness, respectively. All of this is the cluster of cables at the top of the board in the image above. Five of the connections are the top five bits of the eight bits of the first DMX channel, giving a possible 32 patterns, whilst the other six pins are two lots of three IOs that give eight possible speeds and eight brightnesses.
The heavy black cable in the image is the “panic button”. Should the ball controller lock up at all – as it’s done on very few occasions – taking that IO pin high out of the DMX receiver would pull the Teensy’s hardware reset pin low. This inversion is done by the BC547 transistor visible among the yellow cables at the top left of the board.
Finally, what’s the back-end of a toggle switch at the top right switches the controller in and out of DMX mode. With DMX switched off, the ball goes into an automatic mode (subject to the code).
Programming it
It may come as no surprise to learn that the ball’s code started life as the “DemoReel100” example from the FastLED codebase on GitHub.
// FastLED "100-lines-of-code" demo reel, showing just a few
// of the kinds of animation patterns you can quickly and easily
// compose using FastLED.
//
// This example also shows one easy way to define multiple
// animations patterns and have them automatically rotate.
//
// -Mark Kriegsman, December 2014
Thank you Mark.
To that I added the XYMatrix for the “serpentine” layout, and later the parallel output and eventually the OctoWS2811 code which saved the day, giving the ball the speed boost that it so desperately needed at the time. (I had help from Reddit here too, as I was way out of my depth and running out of time.)
With the code running – albeit on the “test ball” referenced in Part 1 – I created some basic patterns of my own. Here’s an example of how simple this can be: turn on every LED in a column (`for (int y = 0; y < kMatrixHeight; y++)`), and rotate around the ball - remembering to turn the previous column off as you go. When you increment the column counter and it overflows off the edge of the ball into invalid space ('x >= kMatrixWidth’), reset the column to zero and keep going.
Once I had it running I added “int stripes = n;” which then let me make the lighthouse’s “beam” multiple columns wide.
void lighthouse()
{
  int x = patternLastX + 1;
  if (x >= kMatrixWidth) { x = 0;}

  int stripes = 2; //How many columns wide is the lighthouse beam?
  for (int y = 0; y < kMatrixHeight; y++)
  {
    leds[ XY( x, y)] = CRGB::White;
    if (x - stripes >= 0)
    {
      leds[ XY( x - stripes, y)] = CRGB::Black;
    }
    else
    {
      leds[ XY( kMatrixWidth - (stripes - x), y)] = CRGB::Black;
    }
  }
  patternLastX = x; // ... and pass back to the main loop.
}
I find it amusing that our persistence of vision sometimes makes it look like more LEDs/columns are lit than really are.
Here are some of the amazing patterns we were able to find on the Internet:
“Matrix effect” – Jeremy Williams
“Pride” – Mark Kriegsman
“Fire2012WithPalette” – Mark Kriegsman
“Applause” – Jason Coon
“Plasma” – github.com/macetech
“BPM” – Mark Kriegsman
“Rainbow – with glitter” – Mark Kriegsman
… and here are a couple of my own creations:
“Pac-Man”
“Reverse Corkscrew”
Statistics
- The ball started life as a ~4′ beach-ball, to which we applied 20 layers of papier mache, consuming around 8L of PVA glue.
- The ball is covered with 96 meters of WS2812B strips, cut into 64 x 1.5m lengths.
- Each of those 64 strips has 45 LEDs, to a total of 2,880 LED pixels.
- Each pixel contains a separate red, green and blue LED, all individually addressable.
- Each coloured LED in the pixels will draw 20mA at full brightness, so if you wanted the ENTIRE ball white at FULL intensity, that’s 3 x .02A x 2880 = 172.8A @ 5V.
- There are two Mean-Well LRS-350-5 60A supplies mounted to the shaft inside the ball. This “theoretical” shortfall of 52.8A means I can’t run the ball at full white, which I never intended would happen. The power supplies have over-heat and over-current protection, but I’ve never put this to the test.
Cost
The ball wasn’t the cheapest to build. Here’s a VERY quick back-of-an-envelope summary:
$145 – the ball itself.
$365 – the WS2812B LEDs – courtesy of “Chinly” on eBay.
$128 – the big-ticket electronics (Teensy, Level Shifter)
$180 – 2 x power supplies
That’s a total of $818, to which you’ll need to add several $hundred of misc electronics and hardware, so let’s call it easily a thou+. (We’ll overlook the LED string on the “test ball”, the second set of Teensy & level shifter, and some of the eBay power supplies I binned in disgust.)
All prices are $AU. Divide by 1.45 to get a rough $USD conversion.
Credits
SO many people have contributed to the FastLED project, and I’m indebted to them all. Thank you!
The patterns I’ve found online made up the lion’s share of the 32 that are coded into it. I’ve endeavoured to credit them all in the code, and in the videos of them on my YouTube channel.
Special thanks to Rocky for patiently papier macheing the ball over more than a fortnight. Had we realised at the outset how much effort would go into this step alone, we would have abandoned this as a technique, and maybe the whole project altogether.
Code
Lessons Learnt
If we had our time over, we’d do a few things differently. Here’s the short version:
- If you don’t know what “FastLED” is and couldn’t tell a ws2811 from ws2812, you’re going to probably need months of nights if you’re going to do anything complicated – and that’s AFTER all the bits arrive from China/where-ever. The PacMan pattern only took a couple of hours to knock together once I had the ball going, but complicated patterns like those of the other contributors take some in-depth understanding of the module (and possibly a maths degree).
- From my own personal experience, I’d say DON’T BUY power supplies from eBay. It seems to me that all of the vendors selling into Australia at the moment are selling what I’d consider to be seconds stock – or as you’ll see above, repaired returns, sold as new.
- DO buy proper Mean-Well supplies from the likes of Power Supplies Australia. I’d never heard of them until I started desperately searching for power supplies I can trust, and they rescued me at the 11th hour with *proper* supplies, well-packed and shipped overnight. Exceptional service and I can’t recommend them higher.
- We fluked this one, but if you’re building a ball like this, DO choose a spacing that lets you run a number of columns that are a power of 2 – and by that I mean 16, 32, 64 or 128. Why? When it came time to stick the LEDs to the ball, we wanted to make sure we didn’t screw it up. By being a power of 2 it meant we could start with one strip, then put the next halfway around the ball, and continue dividing it in half with each strip. The end result is any errors should be averaged out, and you won’t get to the end of the ball and not have enough space – or too much space – for the last strip(s).
- One mistake we made was sticking all the LEDs down starting at the top, and the result is that some of the strips ended up out of vertical alignment by the time they got to the bottom, which is visible when the patterns are chasing. As the ball is above people, we should have laid the strips on from the bottom to the top.
- The adhesive on the LEDs will not hold. You’ll need to add some drops of SuperGlue at regular intervals.
- You’d have to be nuts to choose this papier-mache path. SOMEONE will be able to sell or make you a sphere / two hemispheres of fibreglass.
Revision History
31st December 2019. This is the initial publication, back-dated in the blog’s timeline to July 27th.
8th January 2020. Corrected the $US conversion maths. (Thanks James). *blush*
– G.


Thanks, Greig, that was a great read.
This is why I’m so big on open-sourcing everything these days, I’m sure that everyone who made a pattern, or some interface code loves seeing their creations being put to such creative uses.
I will say for anyone interested in embarking on this journey. Fibreglass isn’t some big scary thing, its super easy to work with once you follow some basic rules. I’m sure YouTube is full of guides.
If you’re struggling to source material because Bunnings charges out the nose for it. Speak with your local car stereo installation mob. They will typically have someone skilled in fibreglass and will happily hook you up for a few cans.